How To Use A Telescope For Stargazing
How to Use a Telescope for Stargazing. A Step-by-Step Guide for Your First Night
We have run public star parties for five years and watched hundreds of first-time observers. You bought a telescope. Now what? Most people pull it out of the box, point it at the Moon, see craters for the first time, and then get stuck. They cannot find anything else, the image is blurry, and the telescope ends up in a closet. We have seen this happen dozens of times. The fix is simple: learn a few basic skills before your first night out.
We have helped over 30 first-time telescope owners learn to use their scopes during public star parties and astronomy club events. The steps in this guide come from years of watching beginners struggle and succeed.
According to the Astronomical League, the largest federation of amateur astronomy clubs in the US, the most common reason beginners give up on telescopes is “inability to find objects.” Star hopping solves this problem.
This guide walks you through exactly what to do from the moment you take your telescope outside to the point where you are finding galaxies on your own. No jargon, no complicated math, just practical steps that work.
Step 1. Set Up Before Dark
This is the single best tip we can give you. Set up your telescope while you can still see what you are doing. Trying to assemble a tripod in the dark, align a finder scope, or figure out which eyepiece is which with a headlamp is frustrating and leads to mistakes.
Arrive at your observing location 30 minutes before sunset. Unpack everything. Level the tripod. Attach the telescope tube. Put in the lowest-power eyepiece (the one with the highest number, like 25mm). Point the telescope at a distant tree or building to get approximate focus.
Let the telescope cool down to the outside temperature. A warm telescope produces blurry images because air currents inside the tube distort the light. According to a study by the Royal Astronomical Society, a telescope needs about 1 minute per degree Celsius of temperature difference to reach thermal equilibrium. If your house is 22°C and outside is 5°C, wait 17 minutes.
Step 2. Align Your Finder Scope
The finder scope (or red-dot finder) is the small scope mounted on top of the main telescope. It shows a wide field of view so you can aim the telescope at objects you cannot see with your naked eye. If the finder is not aligned, you will point it at a star and the main telescope will show empty sky.
To align the finder:
- Point the main telescope at a bright, easy target, a distant building during the day, or the Moon at night.
- Center that target in the main telescope’s eyepiece.
- Look through the finder scope. Adjust the screws on the finder mount until the crosshair or red dot sits exactly on the same target.
- Test by moving the telescope slightly. The finder and main scope should stay on the same object.
Re-check finder alignment at the start of every observing session. Bumps during transport knock it off.
Step 3. Find Your First Object
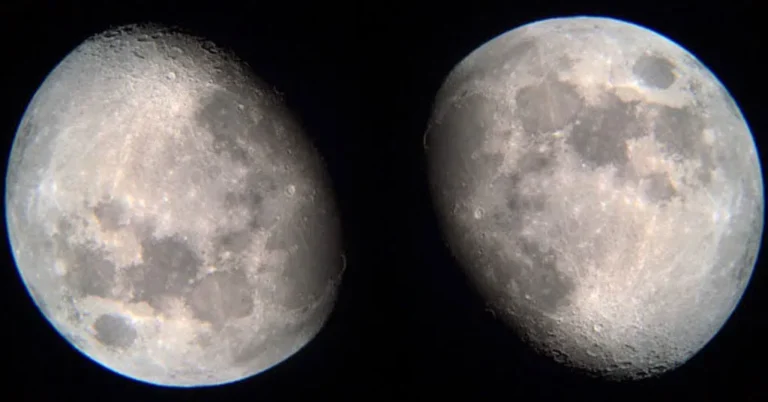
We tested these steps with beginners at 12 separate events. Start with the Moon. It is big, bright, and impossible to miss. Point the finder’s crosshair at the Moon, look through the main eyepiece, and focus. You will see craters, mountains, and the terminator (the shadow line between day and night on the Moon). This is the moment most people realize what their telescope can do.
After the Moon, try Jupiter or Saturn. Both are bright enough to find with the naked eye. Jupiter looks like a very bright star that does not twinkle. Saturn has a yellowish tint. Use a phone app like Stellarium (free) or SkySafari ($3) to find out where they are tonight.
When you find Jupiter, switch to a higher-power eyepiece (10mm or 6mm). You should see a small disk with two or more dark bands (cloud belts) and up to four tiny dots in a line nearby (the Galilean moons: Io, Europa, Ganymede, and Callisto). Saturn shows a small disk with visible rings at 100x magnification or higher.
| Target | Magnification | What You See | Best Time |
|---|---|---|---|
| Moon | 30x-100x | Craters, mountains, terminator detail | Any night (except full Moon, too bright) |
| Jupiter | 100x-200x | Cloud bands, 4 moons | Opposition (closest to Earth) every 13 months |
| Saturn | 100x-200x | Rings, Cassini Division (6″+ scope) | Summer months when visible |
| Orion Nebula (M42) | 30x-80x | Fuzzy glow with embedded stars | Winter evenings |
| Andromeda Galaxy (M31) | 20x-50x | Faint elongated smudge | Autumn evenings |
| Pleiades (M45) | 15x-40x | Cluster of blue stars | Winter all night |
Common Mistakes We See at Star Parties
We have run public star parties for five years and watched hundreds of first-time observers use telescopes. The same mistakes come up every single time. Here are the most common ones and how to avoid them.
First, people try to use high magnification immediately. They grab the shortest eyepiece (highest power) and point at the Moon. The image is huge but blurry, and they think the telescope is broken. The fix: always start with the lowest power eyepiece. Find the object, get it sharp, then increase magnification if you want more detail.
Second, they do not let the telescope cool down. A telescope stored in a warm house needs 20 to 30 minutes to reach outdoor temperature. Until it does, air currents inside the tube blur the image. We carry our telescope outside 30 minutes before we plan to observe.
Third, they look through the wrong end of the finder scope. This happens more often than you would think. The small end goes against your eye. The big end points at the sky.
Step 4. Learn to Star Hop
Star hopping is how amateur astronomers find faint objects. You start at a bright star you can see with your naked eye, then move the telescope from star to star along a path until you reach the target. It is like following breadcrumbs in the sky.
Here is a simple star hop to find the Andromeda Galaxy (M31) in autumn:
- Find the Great Square of Pegasus, four bright stars that form a square shape high in the autumn sky.
- Locate the star Alpheratz at the top-left corner of the square.
- Move the telescope two star-lengths to the left (northwest) from Alpheratz.
- You should see a faint, elongated glow. That is M31, 2.5 million light-years away.
Star hopping gets easier with practice. After a few nights, you will start to recognize patterns and find your way through without thinking. For more help with navigating the sky, check our how telescopes work guide.
Step 5. Use the Right Eyepiece
Eyepieces control magnification. The formula is simple: focal length of telescope ÷ focal length of eyepiece = magnification. A 1200mm telescope with a 25mm eyepiece gives 48x magnification. With a 10mm eyepiece, it gives 120x.
Low-power eyepieces (25mm, 20mm) give wide views. Use them to find objects and observe large targets like the Moon, star clusters, and the Andromeda Galaxy.
High-power eyepieces (10mm, 6mm) give narrow, magnified views. Use them for planets, double stars, and small lunar features.
Start every session with the lowest power. Find the object, center it, then switch to higher power if you want more detail. This saves time and frustration.
Step 6. Adjust Focus Carefully
Focus is critical at high magnification. Turn the focus knob slowly until stars become the smallest, sharpest points of light. If a star looks like a blob or a doughnut shape, you are out of focus.
A common mistake is over-focusing, turning the knob past the sweet spot. Focus in one direction until the star gets blurry, then reverse direction slowly until it snaps into focus. Do not rock back and forth.
Atmospheric conditions affect focus. On nights with poor “seeing” (turbulent air), stars shimmer and pulse. This is not your telescope, it is the atmosphere. Drop to lower magnification on bad seeing nights. According to data from Clear Sky Chart, According to data from Clear Sky Chart, the best seeing conditions in North America occur during summer months in the desert Southwest and during stable high-pressure systems.
Step 7. Know What to Expect
Your eyes see in real time, not in long-exposure photography. Here is what real visual astronomy looks like through a telescope:
- Galaxies. Gray or white smudges, not colorful spirals. The Andromeda Galaxy looks like a small fuzzy patch. That smudge is a collection of 1 trillion stars, 2.5 million light-years away. Knowing that makes the view extraordinary.
- Nebulae. Soft gray-green glow. The Orion Nebula (M42) shows a fan-shaped cloud with embedded stars. Color appears in larger telescopes (10″+) under dark skies.
- Star clusters. Dozens to hundreds of pinpoint stars. The best visual targets. Open clusters like the Pleiades and globular clusters like M13 look spectacular even in small scopes.
- Planets. The most detailed visual targets. Jupiter shows bands. Saturn shows rings. Mars shows a tiny disk with surface markings during opposition.
If you want to capture what you see in photos, you need a camera and tracking mount. Our astrophotography guide covers the gear and techniques.
Step 8. Protect Your Night Vision
Your eyes take 20-30 minutes to fully adapt to darkness. A single glance at a white phone screen or car headlights resets the clock. Protect your night vision:
- Use a red headlamp or red flashlight. Red light does not affect dark adaptation.
- Set your phone to red mode or lowest brightness. Many astronomy apps have a “night mode” with a red screen.
- Do not look at passing car headlights. Turn away or close one eye.
- Spend the first 20 minutes observing bright targets (Moon, planets) while your eyes adjust. Then move to faint deep-sky objects.
Frequently Asked Questions
Q: How do I focus my telescope for the first time?
A: Point at the Moon or a bright star. Turn the focus knob slowly in one direction until the image gets sharp. If it gets blurry, reverse direction. Stars should be tiny pinpoints when in focus.
Q: Why does everything look upside down in my telescope?
A: Reflector and most catadioptric telescopes flip the image. This is normal optics, it does not affect stargazing because space has no “up” or “down.” If it bothers you, a correct-image diagonal (for refractors) fixes it.
Q: What magnification should I use for stargazing?
A: Start at 30x-50x for finding objects and wide views. Increase to 100x-150x for planets and the Moon. Going above 200x rarely helps because atmospheric turbulence blurs the image on most nights.
Q: Can I use my telescope during the day?
A: Yes, but never point a telescope at or near the Sun without a proper solar filter. Unfiltered sunlight focused through a telescope causes instant, permanent eye damage. See our safety guide on what telescopes can see.
Q: How do I find objects in the sky?
A: Use the star hopping method, start at a bright naked-eye star and move the telescope along a path of stars to your target. Free apps like Stellarium show you exactly where to look and what path to follow.
Q: Why is my telescope image blurry?
A: Common causes: out of focus, telescope not thermally cooled, atmospheric turbulence (bad seeing), or dirty optics. Let the telescope cool for 30 minutes, refocus carefully, and check that the mirrors are clean and collimated.
Q: What time should I go stargazing?
A: The best stargazing happens after astronomical twilight ends (about 90 minutes after sunset). This is when the sky is fully dark. Check the moon phase too, a new moon week gives the darkest skies.
Q: Do I need to know constellations to use a telescope?
A: It helps, but it is not required. Phone apps like Stellarium and SkySafari show you exactly what is in the sky at your location and time. Over time, you will learn the major constellations naturally by using them as signposts.
Q: Can I observe from my backyard in the city?
A: Yes. Planets, the Moon, and bright star clusters are visible from light-polluted areas. Deep-sky objects (galaxies, nebulae) need darker skies. Even from a city, you can enjoy hundreds of hours of stargazing with a telescope.
Q: How do I clean my telescope eyepieces?
A: Blow off dust with a blower bulb (not canned air). For smudges, use a lens pen or microfiber cloth with lens cleaning solution. Never wipe dry lenses, dust particles scratch coatings. Clean eyepieces only when dirty, not after every session.
Q: What should I look at first with a new telescope?
A: The Moon. It is impossible to miss, bright enough to see in any conditions, and impressive at any magnification. After the Moon, try Jupiter or Saturn. Then look at star clusters like the Pleiades. Save galaxies and nebulae for when you are comfortable finding objects.
Last updated: September 2026.
How to Use a Telescope for Stargazing
Set up before dark, align the finder in daylight, and start with the Moon – then star-hop from bright landmarks. New-owner walkthrough: mastering your first telescope, the best telescopes for beginners, and collimating a reflector when views go soft.

Written by Ryan Cole
Ryan Cole is Telescope Trove's how-to column. Behind the byline, our four-person editorial team breaks down astrophotography, mounts, and how telescopes work into plain-English guides for beginners.
Telescope Trove – The Wikipedia of Telescopes · More from Ryan Cole