How to Collimate a Reflector Telescope in 15 Minutes (Step-by-Step)
If Jupiter looks like it’s trailing a faint comet’s tail, or a bright star refuses to snap into a clean point no matter how you focus, your reflector’s mirrors are almost certainly out of alignment. Not broken just out of collimation. This happens to nearly every Newtonian and Dobsonian owner, often within the first few sessions, and it’s usually fixed in under ten minutes once you know what you’re looking at.
This guide covers what collimation actually does, which telescopes need it (and which don’t), the tools worth owning, the step-by-step alignment sequence, and the mistakes that cause the most frustration. By the end, checking collimation should feel like a routine fiveminute part of setting up your scope not a chore you dread.
What Is Telescope Collimation (and Why It Matters)
Collimation is the process of aligning a telescope’s optical components in a reflector, that’s the primary mirror, the secondary (diagonal) mirror, and the focuser so they all share one optical axis. When everything lines up, light from a star lands exactly where the eyepiece expects it. When it doesn’t, the image degrades in a specific, recognizable way: stars smear into small comma or teardrop shapes instead of staying as tight points, especially away from the center of the field.
That comma-shaped distortion is called coma, and it’s worth knowing that coma isn’t purely a collimation problem. Every Newtonian design has some inherent coma toward the edge of the field it’s a property of the parabolic mirror, not a defect. Faster telescopes (f/4 or f/5) show it more than slower ones (f/8 and up). What collimation does is make sure the coma-free zone – often called the mirror’s sweet spot is centered exactly where you’re looking, rather than off to one side where you’d see distortion even near the middle of the eyepiece. For a deeper technical look at how the sweet spot is calculated, Sky & Telescope’s Newtonian alignment guide is a solid follow-up read.
Does This Guide Apply to Your Telescope?
Not every telescope handles collimation the same way, and applying Newtonian instructions to the wrong design can cause more harm than good.
- Newtonian / Dobsonian: Yes this guide is written for you. Both mirrors are user-adjustable, and checking collimation is routine maintenance. If you’re not sure what sets a Dobsonian telescope apart from other Newtonians, that’s worth a quick read first.
- Schmidt-Cassegrain (SCT): Partially. Only the secondary mirror, mounted in the corrector plate, is meant to be user-adjusted usually with three small screws. The primary is factory-set and rarely needs attention.
- Maksutov-Cassegrain: Rarely user-serviceable. The primary is typically sealed and hard to access; if a Mak seems miscollimated, that’s usually a job for the manufacturer, not a DIY fix.
- Refractor: Almost never. Refractors are factory-aligned and hold collimation extremely well since there’s no secondary mirror or adjustable cell to shift. A hard drop is about the only thing that changes that see our refractor vs. reflector comparison for why this maintenance gap matters when choosing between the two.
The rest of this guide focuses on Newtonian reflectors, since that’s where nearly all user-adjustable collimation happens.
Signs Your Reflector Needs Collimation
- Stars look like small commas, teardrops, or “seagulls” instead of clean points especially away from the center of the field
- Planets look consistently soft or smeared, even in steady conditions and at best focus
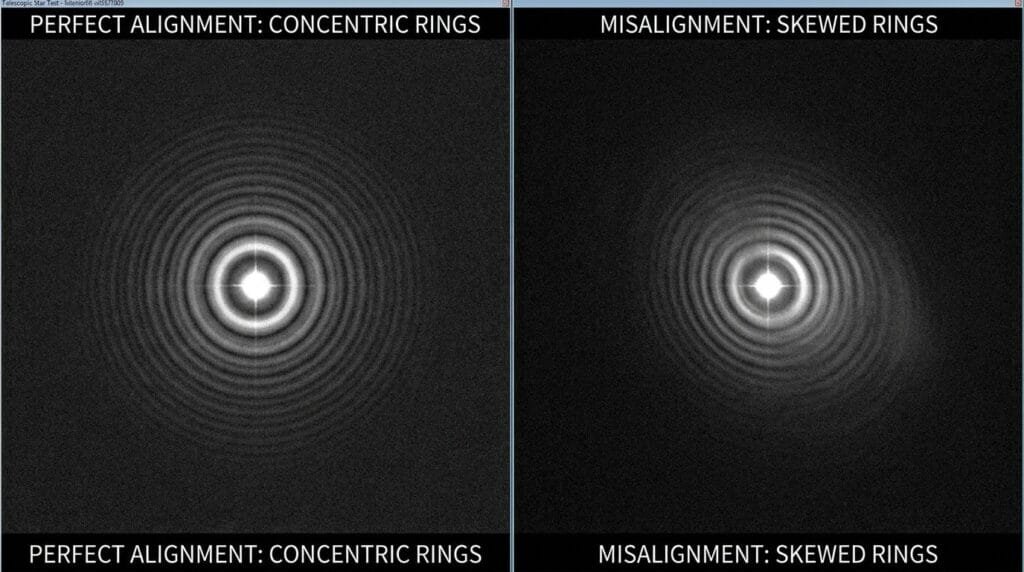
- A star test at focus shows lopsided, uneven diffraction rings instead of concentric circles
- The telescope was recently shipped, transported, or dropped
- You just unboxed a new telescope shipping is one of the most common causes of day-one misalignment, and it doesn’t mean the unit is defective
Tools You’ll Need to Collimate a Reflector Telescope
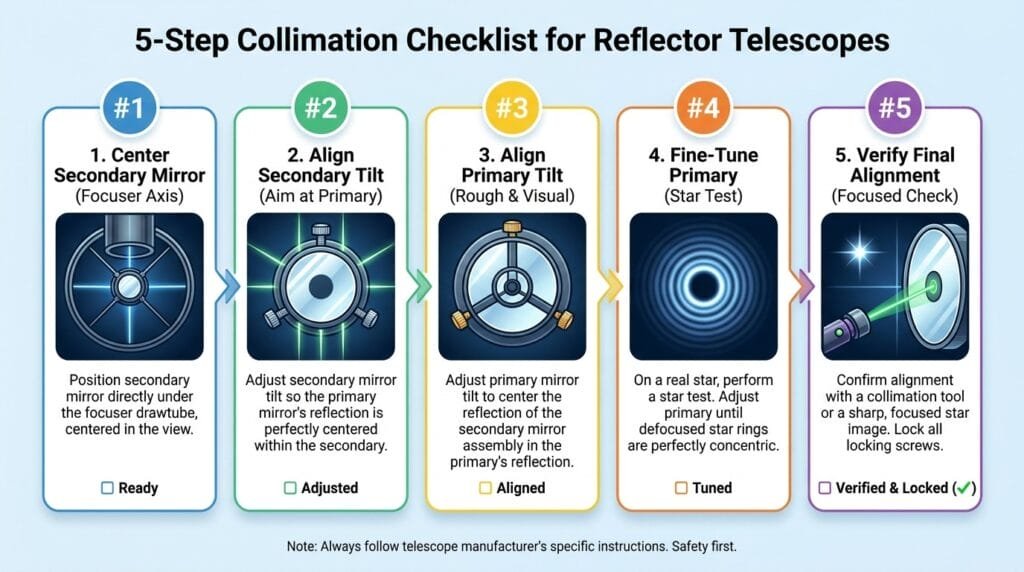
Step-by-step checklist for collimating a reflector telescope
Collimation Cap (Sight Tube)
A simple plug with a peephole in the center that fits into your focuser in place of an eyepiece. It’s the cheapest option some telescopes even ship with one and it’s enough for rough, get-you-observing alignment.
Cheshire Eyepiece
Adds a crosshair and an angled reflective surface to the sight-tube concept, making it much easier to judge when the mirrors are truly centered. It needs no batteries and doesn’t depend on its own internal alignment being correct, which is why many experienced Newtonian owners treat it as their primary tool rather than a backup.
Laser Collimator
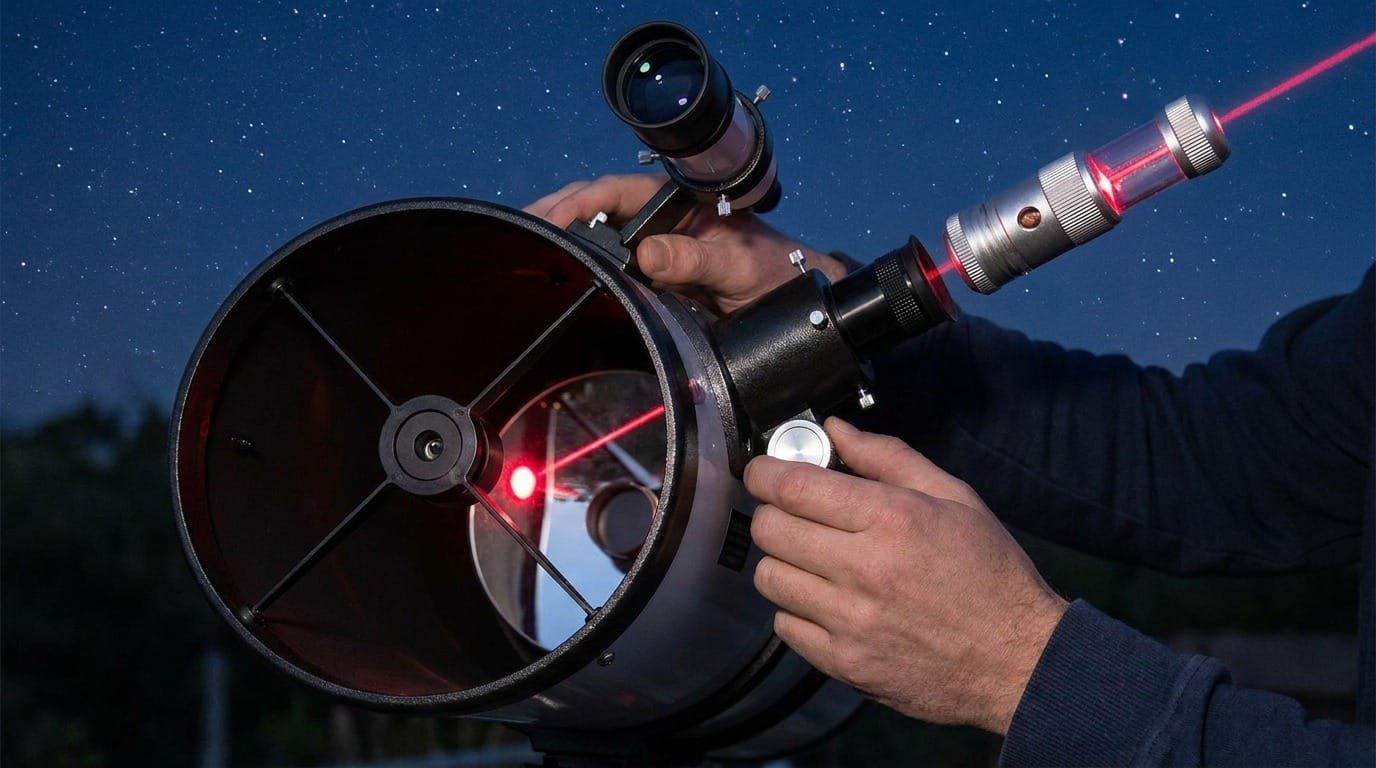
Sits in the focuser and projects a beam that should bounce off the primary mirror’s center mark and land back on itself. It’s fast often the quickest way to get a rough collimation dialed in but it has one real weakness: it’s only as accurate as its own internal alignment. A laser collimator that’s been dropped can look like it’s working perfectly while quietly throwing off every telescope you use it on. Check it periodically by rotating it in the focuser (or resting it in a V-block) and watching whether the dot stays put. And never point a laser collimator’s beam at anyone’s eyes it’s bright enough to cause real harm.
Autocollimator
The most precise option, mainly useful for fast focal-ratio telescopes (f/4–f/5) where small errors are more visible, or for owners pushing collimation to its practical limit. It removes the laser collimator’s biggest weakness by checking alignment optically rather than relying on the tool’s own accuracy.
| Tool | Cost | Precision | Best For |
| Collimation cap | $ | Rough | Quick get-started alignment |
| Cheshire eyepiece | $ | Good | Everyday primary tool |
| Laser collimator | $$ | Good (if trued) | Fast setup, needs periodic checking |
| Autocollimator | $$$ | Excellent | Fast (f/4–f/5) scopes, perfectionists |
How to Collimate a Newtonian Telescope: Step-by-Step
Do this in daylight the first time it’s much easier to see what you’re doing, and you can fine-tune with a star test once it’s dark. Point the tube at a bright, evenly lit surface like the sky or a wall, never at the sun.
Step 1: Confirm the Primary Mirror Has a Center Mark Every collimation method relies on identifying the exact center of the primary mirror. Most telescopes ship with a small ring or dot already applied. If yours doesn’t have one, check through the empty focuser before doing anything else adding a center mark is a five-minute job most manufacturers cover in their manuals.
Step 2: Center and Square the Secondary Mirror Insert your collimation cap or Cheshire and look down the focuser. You should see the secondary mirror’s outline, and inside it, a reflection of the primary mirror. Using the small screws in the secondary’s spider (usually Allen or Phillips head), adjust until the secondary appears as a full circle centered in your view, with the primary’s reflection centered inside that circle. Move slowly loosening the center screw too far can let the secondary drop onto the primary.
Step 3: Align the Primary Mirror Look at the primary mirror’s reflection through your Cheshire or laser. You’ll see the crosshair (or laser dot) and the mirror’s center mark. Adjust the primary’s collimation screws, at the back of the mirror cell, until the center mark lines up exactly with the crosshair, or the return beam lands back on the laser’s own aperture. Most primaries have three collimation screws turn one at a time and watch which direction moves the reflection rather than guessing.
Step 4: Fine-Tune With a Star Test Once it’s dark and the telescope has had time to reach outside temperature a tube still cooling down shows false, shifting errors from internal air currents, not real misalignment point at a moderately bright star and center it. Slightly defocus in and out. You should see rings (or, further out of focus, the shadow of the secondary and its spider vanes) that stay concentric as you move through focus. If they’re consistently lopsided in one direction, make small adjustments to the primary’s collimation screws and recheck.
Step 5: Lock It Down If your telescope has separate locking screws, snug them after adjusting just enough to hold position, not so tight that you pull the mirror cell out of alignment again. Recheck the star test once everything’s locked to confirm nothing shifted.
How Often Should You Collimate?
There’s no single right answer it depends on the telescope:
- Truss or collapsible Dobsonians that get broken down for storage or travel: check every time you set up.
- Solid-tube reflectors that stay assembled: collimation usually holds for weeks or months of normal use.
- After any transport, bump, or fall: always recheck before your next session.
- New telescopes: check on the very first night. Shipping is one of the most common causes of out-of-the-box misalignment, and it’s normal, not a defect.
A quick check takes well under a minute once you know the star-test pattern to look for worth doing as a habit rather than only troubleshooting when something already looks wrong.
Common Collimation Mistakes to Avoid
- Adjusting the primary mirror before the secondary is properly centered this just chases a moving target
- Fine tuning with a star test before the tube has cooled to outside temperature
- Overtightening the mirror cell’s springs or lock screws, which can pinch the primary and introduce astigmatism that looks like a collimation problem but isn’t
- Trusting a laser collimator that’s never been checked for its own accuracy
- Skipping the center spot and trying to collimate by eye alone
- Forcing the secondary’s center screw loose to “start fresh” it’s rarely necessary and risks dropping the mirror
Laser Collimator vs. Cheshire Eyepiece: Which Should You Use?
Most experienced owners end up using both, for different jobs:
| Laser Collimator | Cheshire Eyepiece | |
| Speed | Fast | Slower, more deliberate |
| Needs batteries | Yes | No |
| Self-check needed | Yes must be trued periodically | No |
| Best use | Quick top-up before a session | Full alignment from scratch |
If you’re buying your first tool, a Cheshire is the safer single purchase it can’t be “out of true” the way a laser can, and it forces you to actually look at what the optics are doing rather than trust a dot. A laser collimator makes a great second tool once you understand what you’re looking at, especially for fast pre-session checks.
Collimation Safety and Handling Tips
- Handle mirrors by the edges only skin oils and fingerprints on the coating are difficult to remove without professional recoating
- Never point a laser collimator’s beam toward anyone’s eyes
- Never use a daytime collimation check as a reason to point the telescope at the sun align on the sky, a wall, or a distant object instead, and only ever observe the sun through a proper certified solar filter over the full aperture (see our telescope eye safety guide for the full rundown)
- If you see a chip, crack, or damaged coating on a mirror, that’s a repair or replacement issue collimation can’t fix physical damage, and forcing adjustment screws on a damaged cell can make things worse
Once you’ve been through this sequence a couple of times, it stops being a project and turns into a two To minute habit before you observe which is exactly how most experienced reflector owners treat it.
Frequently Asked Questions
What is telescope collimation? Collimation is the process of aligning a telescope’s optical components the primary mirror, secondary mirror, and focuser in a reflector so they share a single optical axis and light focuses correctly.
How do I know if my telescope needs collimation? Look for stars that appear comma- or teardrop-shaped instead of round points, consistently soft planetary views, or uneven diffraction rings during a star test. Recent transport or a new in box telescope are also common triggers.
How often should I collimate a reflector telescope? Truss Dobsonians that get broken down: every setup. Solid-tube reflectors: every few weeks to months of normal use. Always recheck after transport or a drop.
Can I collimate my telescope during the day? Yes, for the initial rough alignment point at the daytime sky or a wall, never the sun. Save fine-tuning for a nighttime star test.
Do all reflector telescopes need collimation?
Newtonians and Dobsonians need it regularly. SCTs occasionally need secondary-only adjustment. Maksutovs rarely need user collimation. Refractors almost never need it.
What’s the difference between a laser collimator and a Cheshire eyepiece?
A laser collimator is faster but depends on its own internal accuracy, which can drift if dropped. A Cheshire eyepiece is slower but has no internal alignment to lose, making it a reliable primary tool.
Can collimation damage my telescope? Adjusting the collimation screws themselves is low-risk. The main danger is overtightening the secondary’s center screw (risking the mirror falling) or overtightening the primary’s lock screws (which can pinch and distort the mirror).
Why does my telescope still look blurry after collimating? Check that the tube has fully cooled to outside temperature first, since thermal air currents mimic collimation errors. If the issue persists, it may be seeing conditions, a dew-covered mirror, or less commonly an eyepiece or optical quality issue unrelated to alignment.
Last updated: September 2026.
How To Collimate A Reflector Telescope: The 5-Minute Method
Collimation sounds technical, but it’s a five-minute skill: center the secondary under the focuser, align the primary’s center spot, and star-test. Do it whenever views look soft – it fixes more “broken” telescopes than any upgrade. New to reflectors? Read refractor vs reflector, browse the best telescopes for beginners, and learn how telescopes work, plus how telescope magnification works.

Written by Austin
Austin is the founder and editor-in-chief of Telescope Trove - the Wikipedia of Telescopes. He started the site to give beginners the honest, hype-free telescope advice he wished existed: every guide is hands-on, independently tested, and written in plain English. Austin sets the testing standards for all reviews on the site and personally verifies every buying guide, drawing on years of testing telescopes under real night skies and helping first-time buyers - from complete beginners to seasoned observers - find the right instrument.
Telescope Trove – The Wikipedia of Telescopes · More from Austin